Mooing Servers

There’s nothing more irritating than being sat with your head in a book or in front of a computer trying to concentrate on something you don’t fully understand and getting your train of thought interrupted by something which sounds like a dairy farmers prize Friesian cow in its death throws!

I’ve got a growing family of servers dotted around the house and several of them lurk beneath the desk in the man cave/shack. One of them is a HP Proliant MicroServer which is running FreeNAS and is my dedicated backup server for everything else (I learnt the hard way about not keeping regular backups and invested some wedge in doing it properly – trust me, it’s worth it just to avoid the headache of trying to recover data off of dead disks).

It’s a great little box and very well designed but the fan bearings were giving up and are the source of this bovine interruption to all things cerebral.

A radio problem time out has been called in the pursuit of restoring tranquillity!

An investment of 20 quid in a few fans and a fan cable adapter is all that’s required and overclockers.co.uk is a good place to source components from.

For anyone who needs to perform the same surgery, I’ll list what you need component wise to save you shelling out on HP spares.

The power supply inside the box has a tiny fan which gets very noisy when it starts to go. Hardly surprising on something running 24/7 365! The other culprit is the main case fan.

Investing in –

40x40x10 NB-BlackSilentfan XM-1 https://www.overclockers.co.uk/showproduct.php?prodid=FG-017-NB

120x120x25 NB-BlackSilentPRO PL-1 https://www.overclockers.co.uk/showproduct.php?prodid=FG-017-NB

akasa multi-fan adapter with speed reduction cable https://www.overclockers.co.uk/showproduct.php?prodid=CB-030-AK

will solve the issue

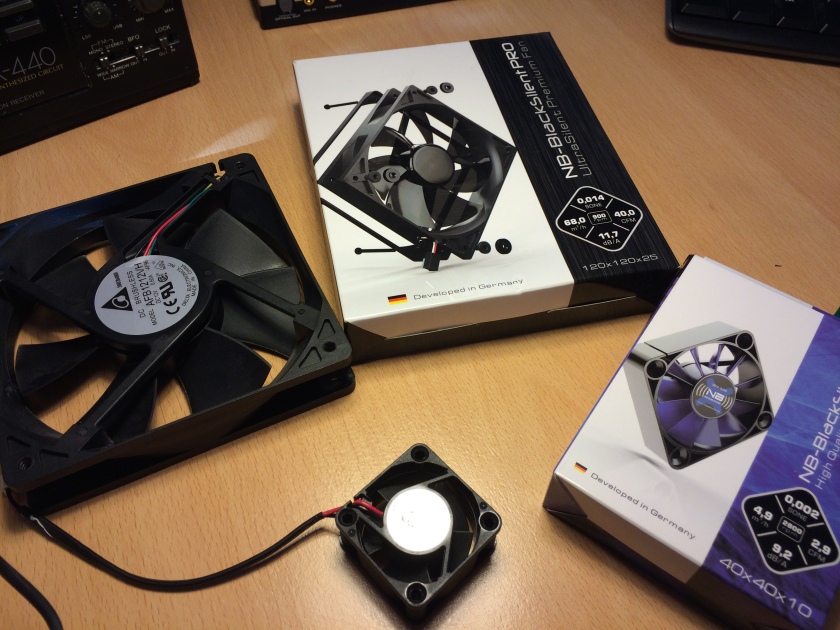
IMG_0851

On the left are the original fans from the case and PSU

The nosiest fan is by far the 40mm PSU fan, this is very easy to replace:

1) remove the screws at the back of the case

2) cut the cable ties holding the PSU cables together with the chassis

3) you don’t need to disconnect the 20/24 pin header from the motherboard IF you disconnect the 4 x molex connectors found below the CD drive tray and gently slide it out otherwise –

4) disconnect the molex cables

5) slide the PSU out of the font of the chassis

6) remove the cover on the PSU (4 screws)

7) remove the 2 screws holding the 40mm fan to the PSU

8) getting into the PSU needs gentle force due to a dollop of glue/resin which is between the case top and the fan connector on the board inside. Once that seal is broken everything comes apart nicely

9) disconnect the 2 pin connector on the PSU motherboard to the fan

10) place the 40mm noise blocker (it is much thinner than the HP fan so you can trail and connect it to a molex on your fan adapter cable)

11) put it all back together ensuring everything is sat nicely within the enclosure and not fouling anywhere

12) add the fan cable adapter to the molex connections inside the case and plug the fan into the yellow/black 12V supply

That’s a £4 repair rather than laying out on a whole new PSU. For the feint hearted you need an HP spare part number 620827-001 and you are replacing a Delta Electronics DPS-150 TB A Rev 04 3.3v 5A out PSU (HP part number 630295-001)
The 120mm case fan is just as easy to swap out

1) use the HP’s Allen key from inside the front door to remove the 4 fan screws

2) disconnect the header supplying the fan from the motherboard. It’s the white connector next to the internal USB connector at the front left when you open the server door

3) trail the cable out to the top of the chassis

4) slide the fan up and out

5) remove the grill from the HP fan and transfer to the noise blocker. Go easy and gently prise this off with a screwdriver as the plastic lugs holding it in may snap with too much force

6) install the fan and use the self tapping screws you removed in 1) to attach it to the case. Remember to leave the connection on the top so you can easily add the power lead to it

6) the noise blocker is a 3 pin fan rather than the 4 pin original. When connecting it to the mother board you only need the 1st 3 pins facing the front, you’ll need to shave the plastic blip off the fan cable header. The plastic is quite soft and gentle shaving with a craft knife will easily remove it. It won’t fit unless you remove it

The case fan you’ve replaced was speed variable but the new one will run at a fixed speed of 900 rpm which is more than ample for the HP Proliant.

Make sure anything you disconnected is plugged firmly back into the motherboard and you’re done. It may be worth having a copy of the maintenance and service guide to hand as the compact size of the server can make it tricky to work out how they put it all together!

A suitable Zen state has been restored!
Resolving Softrock Ensemble RXTX transmission problems #2

TRANSMITTING A CLEAN AND STABLE CW SIGNAL #1

The first objective is to get the radio working to the point that when Tx is pressed in CW mode a clean and stable CW tone is transmitted.

I’m rapidly learning that with this SDR radio setup there is a strong need to have a conventional radio or a second radio on hand to check the signal that the rig is transmitting.

This leads to the proverbial chicken and egg situation, plus the potential financial considerations. Should I have bought a conventional rig and then thought about building an SDR? Now I’ve built an SDR I need a conventional rig available to test it against. It may have been easier and cheaper to build a 6 foot brick wall and paint a bullseye on it and just head butt it repeatedly!

Thankfully, a very generous Andy has leant me a Sangean 803A/Radio Shack DX-440 (http://www.eham.net/reviews/detail/2814) from his youth. It is a truly classic receiver, which unfortunately they don’t make any more and I wish I could lay my hands on one. It has the advantage of having a separate BFO which is needed for this exercise.

Using the DX-440 with my trusty Sound Blaster Live 24 and an old Dell Inspiron netbook I was gifted over New Year, I’ve got the means to test what’s coming out of the Softrock.

The netbook has been reinstalled with a copy of Linux Mint 17.1 Xfce 32-bit as the Windows 7 installation on it meant it took nearly 20 minutes to boot! Gotta love Microsoft! It now boots in just under 40 seconds and comes with a whole host of useful radio based applications thanks to the repositories available. Our old friend Fldigi is installed and ready to go!

IMG_0845

It’s a simple setup which allows the spectrum to be examined easily.

The baseline settings on the radio PC are as follows –

Within the Windows sound settings ‘Recording’ Line In for the Asus Xonar DX audio device is set to 2ch 24bit 192kHz

Within the ‘Playback’ Speakers for the Asus Xonar DX audio device is set to 16bit 192kHz

Both are set to 100% volume at present. There is the potential to overdrive the radio which may be causing an issue but at the minute we’ll leave them as they are.

Within HDSDR Soundcard options –

RX Input (from Radio) – Xonar Line In

RX Output (to Speaker) – Realtek Speaker

TX Input (from microphone) – Line 2 VAC (I’m ignoring this at the moment as I haven’t plugged a microphone in and annoyingly you can’t select an audio device option when there’s no device plugged into it. There isn’t a non or not connected option, so you have to select something)

Within HDSDR Options –

TX Output (to Radio) – Xonar Speakers

—-

Within HDSDR Options –

Options > Input Channel Mode for RX > I(Left) / Q (Right)

Options > Output Channel Mode for RX > AF to Left Channel only

The RX settings aren’t relevant at present as this a test of the Tx functionality

—-

Within HDSDR TX Options – (only available when the program is running and you hit the TX button!)

Options > Input Channel Mode for TX > I(Left) / Q (Right) [No Mic!]

Options > Output Channel Mode for TX > not selectable but set at I(Left) / Q (Right)

Swap I and Q Channels for TX output > enabled

Now the logic of this test goes like this. Tune the DX-440 to 14087 kHz, tune HDSDR to 14088 kHz in CW and hit Tx with a dummy load attached

The CW signal which is produced is received on the DX-440 and appears in Fldigi on the waterfall.

Again after much fiddling and stupidity on my part we eventually got somewhere.

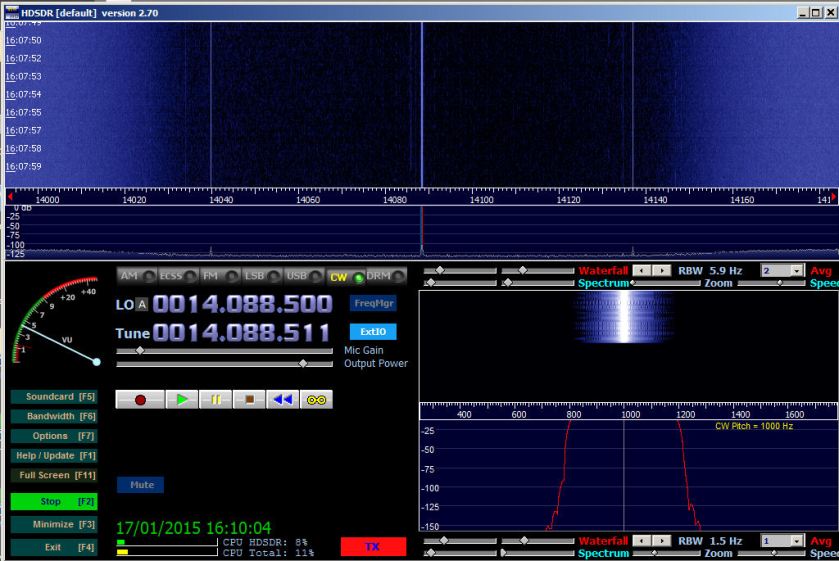
This is a snapshot sequence of keying on HDSDR

Screenshot 2015-01-17 16.10.04

Screenshot 2015-01-17 16.10.06

Screenshot 2015-01-17 16.13.25

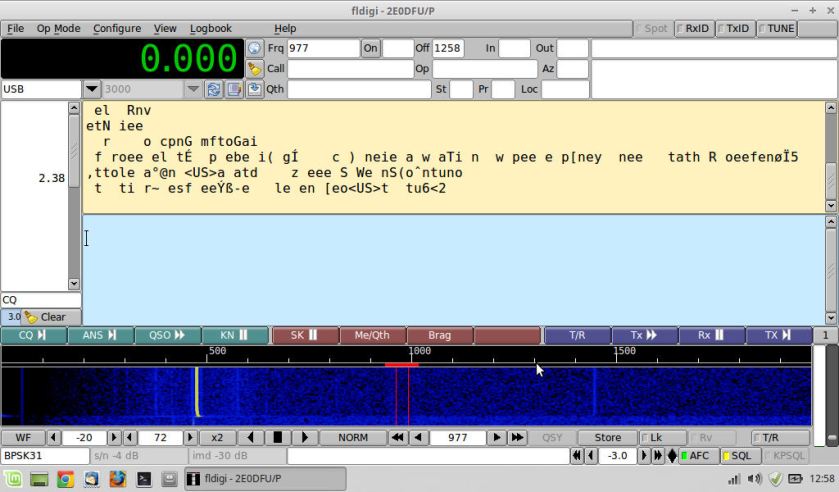
On the DX-440/Fldigi setup this is what is received

Screenshot - 170115 - 12 59 03

Unplugging the cable between the sound card and the DX-440 and listening in a reasonable quality CW tone can be heard. After a bit of playing around, bearing in mind I possess zero Morse key skills, I was able to key out a few letters sufficient enough for Fldigi to accurately decode them.

But it’s no time to for high 5’s and cigars! Look closely at the received signal in Fldigi. It bends and then becomes linear! That said, there are no spurious signals around my CW signal.

This is as far as it goes at the moment as I’ve run out of time, but we’ve accomplished something! We’ve got a radio that transmits a CW tone sufficient for a receiver to detect and decode it.

As to the quality of the signal, that still needs work. I have concerns about possibly over driving the radio and I need to have a long look at the Output Channel Calibration for TX settings within HDSDR. The bent signal is almost as if there’s a lag somewhere. These things need to be looked at again in a methodical fashion but it’s progress!

Resolving Softrock Ensemble RXTX transmission problems #1

The title of this one says it all. There are problems with this Softrock based rig and unfortunately there are no simple “follow this guide” solutions out there to alleviate the problem quickly and simply.
From the research I’ve undertaken there’s a definite need for an understanding of this radio system from the ground up but I can safely say after the man hours invested in this to date, with no success on the transmission side, I could kill for a “do this and it will work” guide just to have the pleasure of seeing it work!

As such I plan to document this as clearly as possible with as much detail so that anyone else who finds themselves with this issue doesn’t have the same battle I’ve had!
That said there are a huge mountain of variables which will differ between individual setups but the main issue I’ve found with other articles on the Internet is the massive contradictions between them and the assumption of a knowledge level that unfortunately I don’t have and it will be a few more years before I do.

As such, what I publish is “what worked for me” and hopefully will help someone.

To put the problem into context before we move towards finding the solution, it may help to recap a few things for those of you joining the party late and to prevent you from having to read pages of previous posts.

The brief of my project is to build a software defined radio (SDR) based around a purpose built PC with a high end soundcard and a Softrock Ensemble RXTX.

The spec of the Radio PC is as follows –

Intel i5-4440 3.10GHz  processor
ASRock H81M-ITX motherboard with an Intel chipset and on board Realtek ALC892 audio
16GB memory and a solid state hard drive

Xonar DX soundcard with driver version 7.12.8.1794

The PC is running Windows 7 Professional x64 SP1

Prebuilt Softrock Ensemble RXTX

The antenna setup and antenna tuning unit (ATU) don’t influence the problem I have with the setup at this time but are essential components to any rig.

I am utilising VAC virtual audio cable version 4.13.0.5811 and also have VB-Audio cables A&B version 1.0.3.2 installed.

The PC is mute, in that all Windows sounds are disabled along with any audio enhancements that Windows or vendor drivers provide. Check all the available sub menus as some of these features aren’t obvious and you don’t want any more spanners being thrown into the works!

The objective is to use HDSDR with Fldigi for transmission (Tx) and reception (Rx) of digimodes.

Since construction the rig has been working perfectly for Rx purposes with both my favoured SDR program SDRConsole and HDSDR.

Unfortunately HDSDR is the only package which supports Tx along with rig control, a nice spectral display, waterfall and so forth.
If anyone ever enables Tx support in SDRConsole I’ll be jumping ship, but we’ve got to work with HDSDR at the moment!

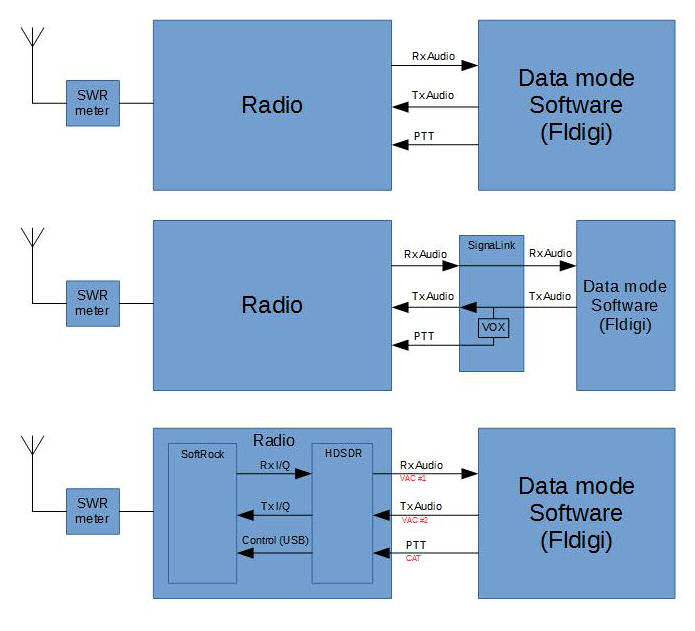
To identify the problem there needs to be a fundamental understanding of what a SDR radio is and how it works compared to a conventional radio that’s attached to a computer.

The following system diagram helps put that into context.

Radio setup variations

I would strongly recommend a read of RadCom’s article in the January 2015 issue (volume 91 number 01) entitled “Getting started in… software defined radio (SDR)”  which really helps lay the foundations.

Naively I was hoping that this thing would work straight away but by the very nature of SDR in this guise there is so much more you need to have functioning correctly before the whole system becomes stable and reliable.

Hind sight is a very exact science! If I’d have bought a Yaesu 817, a Tigertronics SignaLink and a few cables and plugged them all together with a computer on the end running Fldigi I would have had a radio system running digimodes in about 15 minutes, something that a very helpful chap at Martin Lynch & Sons pointed out to me when I rang them last week to speak about conventional rigs.

The thing is I wouldn’t be able to have a remote hidden rig in the manner I want to achieve if I utilised conventional radio hardware. That said I’m now several months on without a fully functioning rig and if the world was my oyster…!

Just before Christmas my good friend Andy (G7UHN) lent me his time, his Elecraft K2 and Elecraft XG2 signal generator in exchange for copious cups of tea and chocolate biscuits, to help fine tune the rig prior to hitting the Tx key.

Despite calibrating the Softrock against the WWV time signals there was still a few Hz discrepancy in the system which is down to the ability of the human eye to read a graticule on a PC screen. That said I hadn’t done too badly but perfection is the name of the game and using a signal generator to provide the reference source pays dividends.

Learning points –

Changes to the Softrock’s configuration is via the application CFGSR which needs to be installed for the Softrock to function and is part of the PE0FKO driver package.
When you make changes to the crystal frequency for the Softrock the changes are written to the file ExtIO_Si570.dll which is saved within the folder C:\Program Files(x86)\CFGSR.

Any changes made here are not global in as much that HDSDR also needs a ExtIO_Si570.dll file within the directory C:\HDSDR. After calibrating CFGSR and being mightily impressed with the results in SDRConsole, when moving across to HDSDR there was a degree of head scratching as to why the calibration had been lost. As such, make sure all your copies of ExtIO_Si570.dll are the same.

With that all sorted, the long awaited TX button was pressed (while transmitting into a dummy load) within HDSDR.
Fldigi’s rig cat works very well and sending a PSK31 transmission was reflected in HDSDR but received very weakly on the Elecraft K2/Fldigi setup which was two foot away.
In addition the transmitted signal from the Softrock just didn’t look right. It was by no means clean and it wobbled around all over the place which was very odd.

The problem was initially suspected between HDSDR and Fldigi with the settings of the virtual audio cables (VACs).

This precipitated a lot of head scratching and Effing and Jeffing over the Christmas period where I tried altering sample rates on the virtual audio cables, within Windows and within HDSDR and Fldigi until I’d exhausted every conceivable combination all to no avail.

It’s at this point I was ready to launch the whole thing out the window but that’d be defeatist!
This rig will work, but conquering the issue preventing it from transmitting won’t be a 5 minute job.

I’ve read countless web articles, guides and so forth over the last few weeks trying to glean anything which could point to the source of the problem.

The guys at the Softrock40 forum and several site owners have been brilliant in answering my questions.
I’ve got to highlight the advice from Steve Arntz (KM5HT) and it’s around his suggestions that this problem solve is based.

The principle is reducing the radio system to its absolute basics and building upwards. At present the finished article doesn’t work and there are too many complications to allow the easy identification of the root cause.

As such, this is a phased approach problem solve where the blocks of the system diagram are “unplugged” and checked for functionality before being plugged back together –

1. Disregard any thoughts of Fldigi and digimode transmission on the Softrock/HDSDR side. This removes any potential issues around virtual audio cables and reduces the system to the “radio” component alone

2. Get the radio functioning and able to transmit a clean and stable CW signal

3. Add a microphone and achieve a clean and stable voice signal transmission

4. Add Fldigi to the system and achieve a clean and stable data mode signal transmission

New Year, New Project (well …)

Ok, so the end of 2014 saw a suspension of all things radio in the name of festivity! 2015 sees the recommencement of work but unfortunately we’ve taken a few steps backwards.

Firstly my uber cool Ulitmate3 QRSS beacon has stopped working, just because I put it in an enclosure. I have no idea why putting it in a box has killed it so it’s back to the drawing board on that one. In short the GPS module appears to have ceased functioning and the beacon is receiving a spurious signal from somewhere that it thinks is the sync pulse from the GPS module. So, it just sits there merrily transmitting in its mind, but in reality nothing is happening. Removing it from the enclosure doesn’t rectify the fault which suggests something has got broken wiring wise in the process.

Hans Summers has released an alternative GPS module which arrived over Xmas, so eventually I’ll rethink my plans. Primarily I’m keeping the power supply outside the enclosure to minimise any noise which is a shame as my little 5v/3.3v board was a fun build and slots perfectly in the PCB rails inside the case. The bonus is the new GPS module runs on 5v straight off of the motherboard so it simplifies matters significantly.

Anyway, the SDR radio issue rattles on. A lot of time and effort has been spent trying to get it working fully. Receive is perfect and I couldn’t be happier. However, Tx is another matter! I’m getting very messy Tx signals with a lot of splatter and tracking down what’s going on is proving harder than expected.

At the moment (with much gratefully received assistance) I’m paring back the radio to it’s absolute basics and looking to get a clean CW transmission, moving then to voice, then to data. Not as easy as it sounds strangely enough because HDSDR is proving a tricky customer to configure and work with.

When I get to a point of success I’ll post something useful for those who find themselves in a similar predicament. All I can say is Google isn’t your friend on this one as there is so much contradictory information out there. The Softrock40 forum have been extremely helpful, but there isn’t a one solution fits all cure to this problem.

In addition various bits of test kit have landed which need building that will help this endeavour. Again, when they play their part any useful data will be shared.